


In this article, we'll work on a few examples to understand the concept of branching and many more concepts.
🔈Demo Of Branching Concept
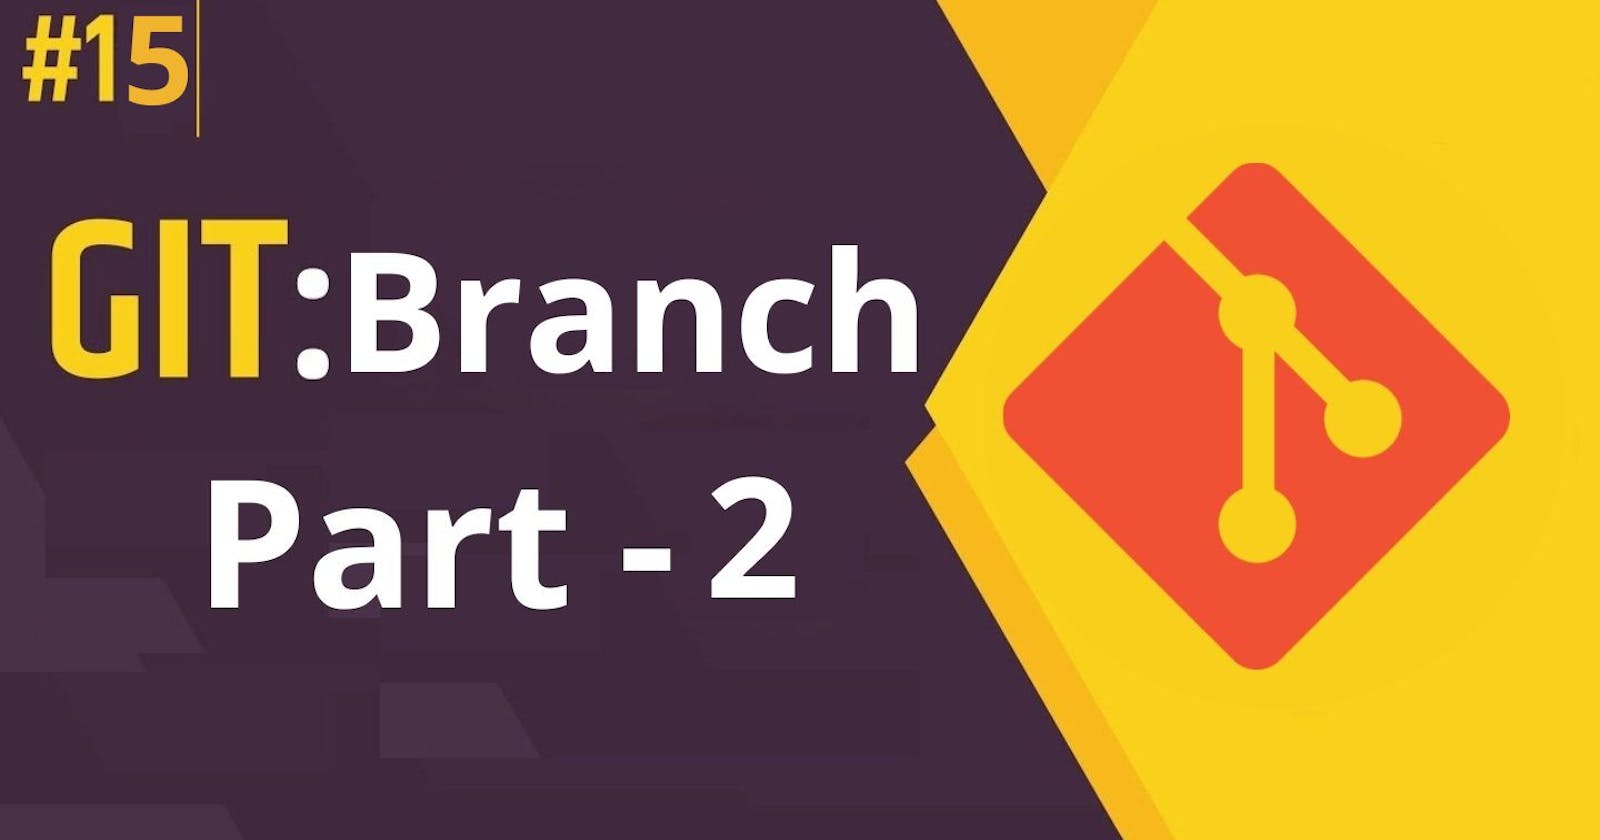
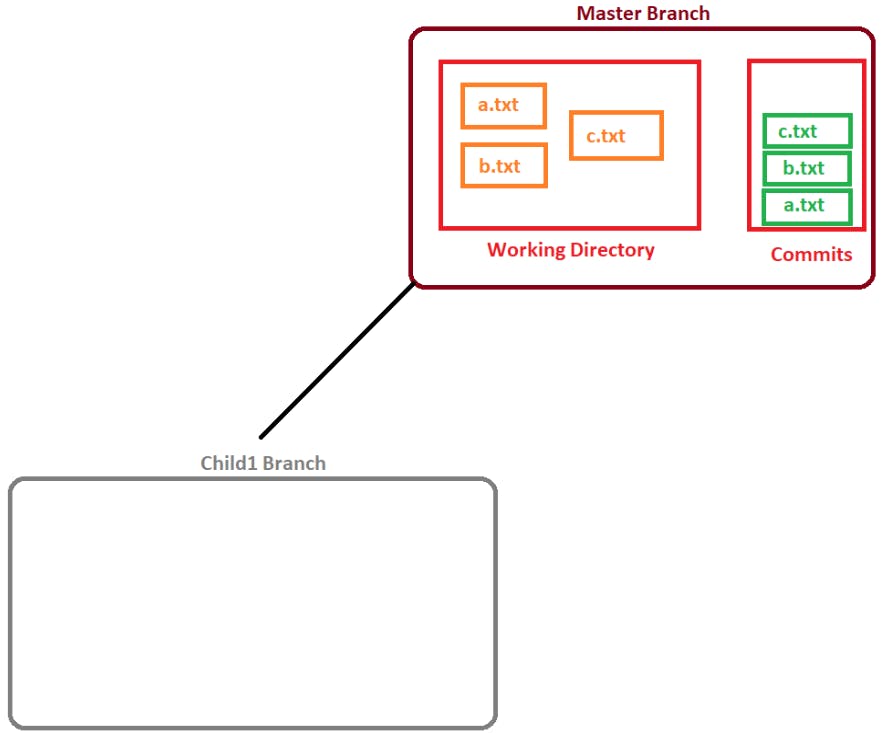
Suppose, We have a master branch. And in that master branch, we have created a few files.
Pictorial Representation
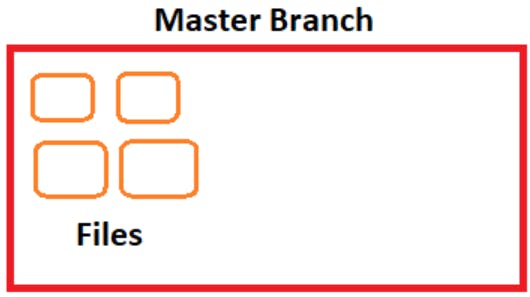
And have multiple commits as well.
Pictorial Representation
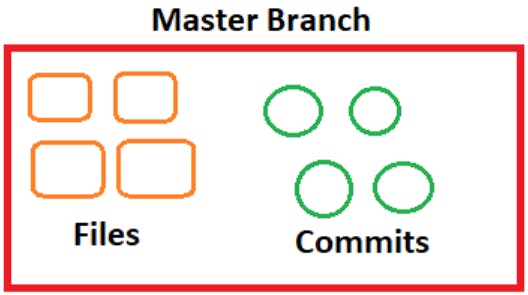
Now, we want to create a Child Branch. And all the files and commit history will be available in the Child Branch as well.
Note: All the files, commit whatever there are in the Master Branch by default will be available to the Child Branch. All the files, commits etc will be Inherited from the Parent Branch to the Child Branch.
Pictorial Representation

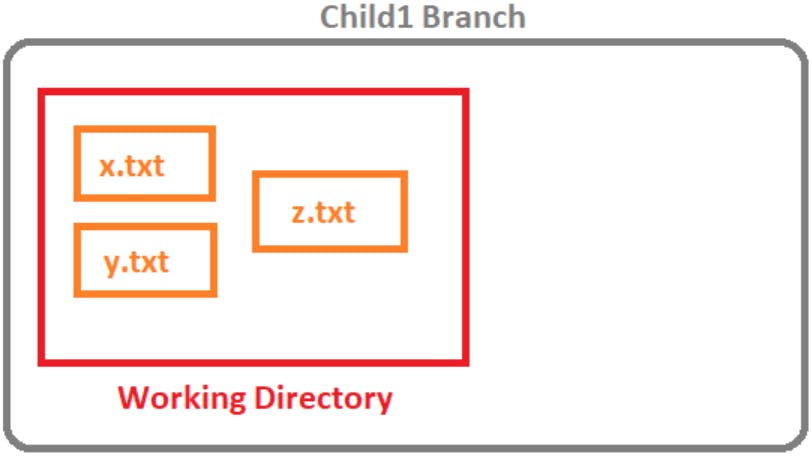
Now if we create a new file & commit it in the Child branch. It won’t be available / present in the Master Branch.
Pictorial Representation
Now, after that, if we make any changes in the Master branch then those changes won’t be present in the Child Branch as we make the changes after the creation of that Child Branch.
Pictorial Representation
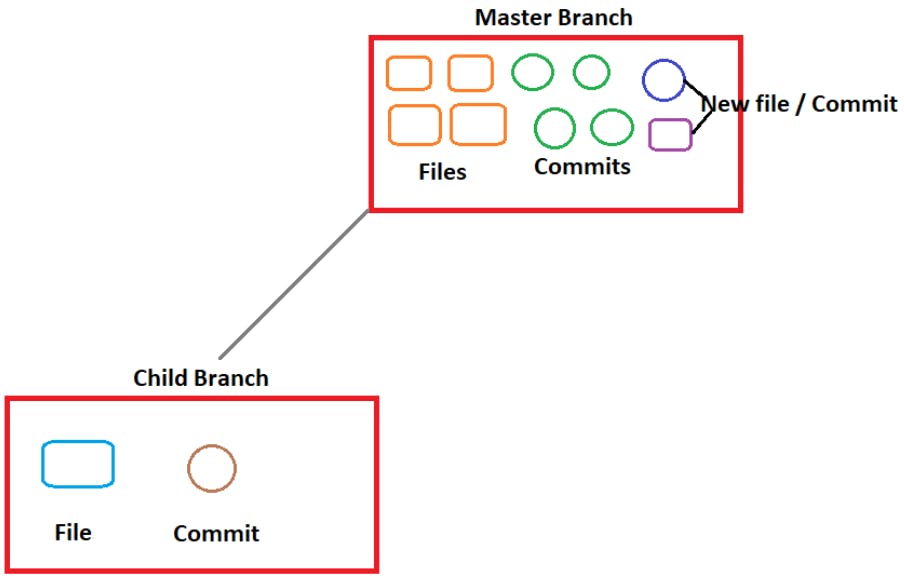
So, all the branches work in an isolated way.
Note: When we merge the Child Branch to the Master Branch, then only the files & commits available in the child branch will be visible in the Master branch
After that, we can delete the particular Child branch. All the branches will be present in the same Repository.
🔉Example On Branching Concept
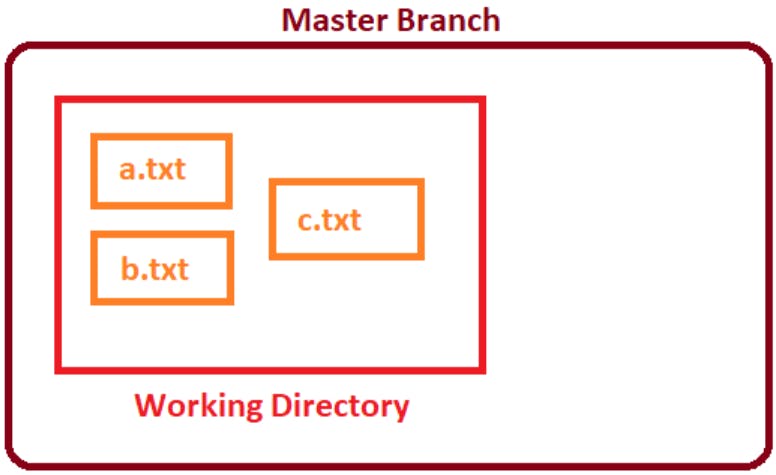
Create a project named “project1” using the command mkdir. And go inside the project using the command cd

Now, initialize the Working Directory “project1” using the commandgit init

So, now the Local repository will be created.
Now, create three empty files in that Working directory “project1” using the command touch
touch <filename>
We’ll create the files “a.txt”, “b.txt” & “c.txt”. So, the command will be
touch a.txt b.txt c.txt

Pictorial Representation
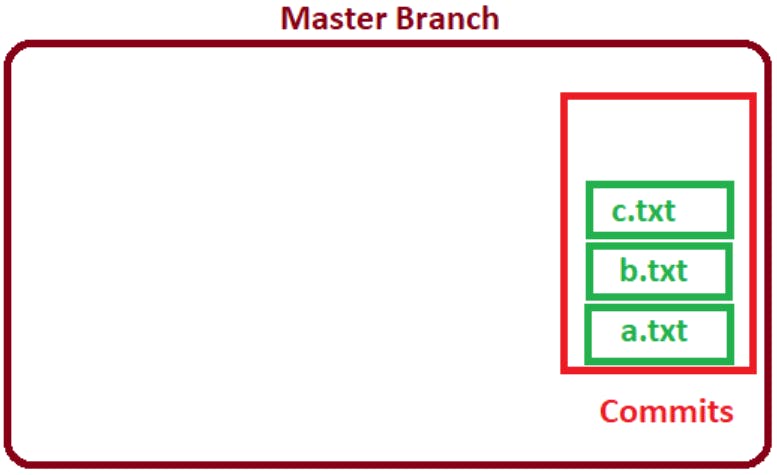
Now, add these files one by one to the Staging Area and Commit them to the Local Repository.
We’ll use the command git add <filename>; git commit -m "Message"
Add the file “a.txt” to the staging area & commit it to the Local Repository.
The command will be git add a.txt; git commit -m "Added a.txt"

Add the file “b.txt” to the staging area & commit it to the Local Repository.
The command will be git add b.txt; git commit -m "Added b.txt"

After that add the file “c.txt” to the staging area & commit it to the Local Repository.
The command will be git add c.txt; git commit -m "Added c.txt"

Pictorial Representation
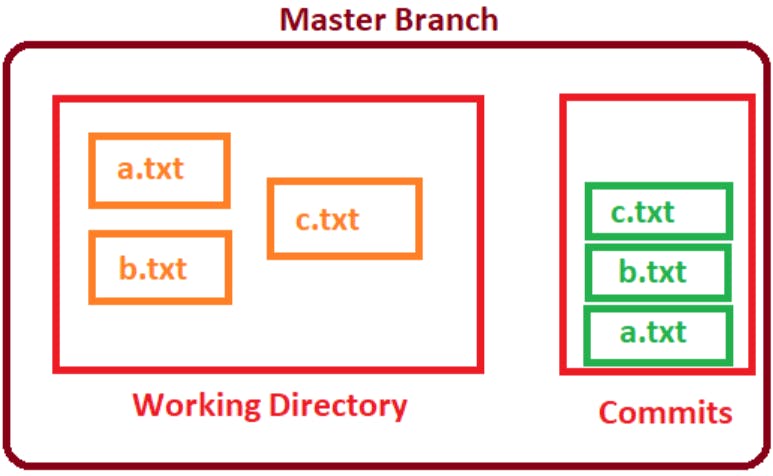
So, we added and committed all the files to the Master Branch. To confirm this we’ll use the command git branch Or git status

It’ll show only one Branch (Master). This means we are having only one branch i.e Master
Note: The symbol Star (*) indicates the current Active Branch. This means, currently on which Branch we are working and that’s the Master Branch
When we check the status of the git using the command git status it'll tell us we are on the Master Branch

It’ll tell “On the Master Branch”, which means we have committed all the files to the Master Branch.
We’ll check the logs as well to know the total number of Commits and the Commit ID.
We’ll use the command git log --oneline

Pictorial Representation
After that now, we have to work on the new feature in that project.
So, Now instead of mixing the new feature in the master branch, we'll create a separate branch for better organisation of the files.
🔈Creating A New Branch
So, we’ll create a new branch named “Child1”. To create a new branch, we’ll use the command git branch <Branch_Name>
In our case. It’ll be git branch Child1

The branch will be created; We’ll confirm that using the commandgit branch
It’ll list all the available branches.

Now, we’ll switch to that Child branch.
🔈Switching To The Branch
As we had created a new branch “Child1”; So, now we’ll switch to that branch to work on the new feature in the project.
To switch to the branch we’ll use the command git checkout along with the branch name.
Syntax: git checkout <Branch_Name>
In our case, it’ll be git checkout Child1

It’ll display a message “Switched to branch 'Child1'”.
Now, we’ve switched to the child branch “Child1”. To confirm that, we’ll use the command git branch Or git status
git branch

If we’ll use the command git branch, then now the star symbol will be before Child1, which means the current Active Branch on which we'll be working is the Child Branch “Child1”.
If we’ll use the command git status, then now it’ll display the message “On branch Child1”
git status

That means we have been switched to the branch “Child1” and there is nothing to commit, and the working tree is clean.
Pictorial Representation
All the files & commits of the Master Branch will be available in the Child Branch “Child1” as well.
Reason: All the files, commits etc will be Inherited from the Parent Branch to the Child Branch.
🏷️ All Files & Commits Will Be Inherited From Parent Branch To Child Branch
We can confirm that all the files, commits etc will be inherited from the parent branch to the child branch by the following steps
Checking / Matching the tracked files on the Child Branch.
Checking / Matching the Logs in the Child Branch.
Checking The Head in the logs in the Child Branch.
⚙️ Checking / Matching Tracked Files On Child Branch
As we have been moved to the Child branch “child branch”. So, now to confirm that all the files, commits etc will be inherited from the parent branch to the child branch, we’ll be checking / Matching the tracked files on the Child Branch.
To list the tracked files on the Child Branch we’ll use the commandgit ls-files
It’ll list all the same tracked files present in the Master Branch i.e files “a.txt”, “b.txt” & “c.txt”.

This shows that the files have been inherited from the parent branch to the child branch.
⚙️ Checking / Matching Logs In Child Branch
As we have been moved to the Child branch “child branch”. So, now to confirm that all the files, commits etc will be inherited from the parent branch to the child branch, we’ll be checking / Matching the Logs in the Child Branch.
To list the logs in the Child Branch we’ll use the commandgit log --oneline
It’ll list all the same logs & commit ID present in the Master Branch after committing the files “a.txt”, “b.txt” & “c.txt” one by one.

This shows that the commits have been inherited from the parent branch to the child branch.
⚙️ Checking The Position Of Head In Logs In Child Branch
As we have been moved to the Child branch “child branch”. So, now to confirm that all the files, commits etc will be inherited from the parent branch to the child branch, we’ll be checking the position of the Head in logs in the Child Branch.
To list the logs in the Child Branch we’ll use the commandgit log --oneline
We’ll see that the HEAD has been pointing to the “Child1” Branch as well as the “Master” Branch.

This shows that the commits have been inherited from the parent branch to the child branch.
Operations On Child Branch
Now, as we are on the child branch “Child1”, we’ll perform a few operations in it.
We’ll create three empty files using the command touch
Syntax: touch <filename>
We’ll create the files “x.txt”, “y.txt” & “z.txt” in the working directory “project1”. So, the command will be touch x.txt y.txt z.txt

Pictorial Representation
Now, add these files one by one to the Staging Area and Commit them to the Local Repository.
We’ll use the command git add <filename>; git commit -m "Message"
Add the file “x.txt” to the staging area & commit it to the Local Repository.
The command will be git add x.txt; git commit -m "Added x.txt"

Add the file “y.txt” to the staging area & commit it to the Local Repository.
The command will be git add y.txt; git commit -m "Added y.txt"

And lastly, Add the file “z.txt” to the staging area & commit it to the Local Repository.
The command will be git add z.txt; git commit -m "Added z.txt"

Pictorial Representation

So, we added and committed all the files to the Child1 Branch. To confirm this we’ll use the command git branch Or git status

It’ll now show two branches Master & Child1.
The symbol Star (*) indicates the current Active Branch. This means, currently on which Branch we are working and that’s the Child1 Branch
When we check the status of the git using the command git status

It’ll tell “On the Child1 Branch”, which means we have committed all the files to the Child1 Branch.
We’ll check the logs as well to know the total number of Commits and the Commit ID. We’ll use the command git log --oneline
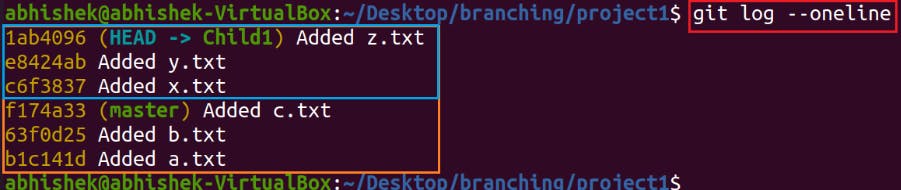
There are 6 commits in the Child Branch “child1”, but there will be only 3 commits in the Master Branch
To prove that we’ll switch back to the Master branch.
Switching The Branch
Now, we’ll confirm that the operation done on the Child branch is isolated from the Master Branch.
To do that, we’ll switch to the Master Branch. To switch to the branch we’ll use the command git checkout along with the branch name.
Syntax: git checkout <Branch_Name>
In our case, it’ll be git checkout master

It’ll display a message “Switched to branch 'master'”.
Now, we’ll switch to the child branch “master”. To confirm that, we’ll use the command git branch

🏷️Parent Branch Won’t Inherit Files & Commits Of Child Branch
We can confirm that the Parent Branch won’t inherit Files & Commits of the Child Branch by the following steps
Checking / Matching all the files on the Master Branch.
Checking / Matching the tracked files on the Master Branch.
Checking / Matching the Logs in the Master Branch.
Checking The Head in the logs in the Master Branch.
⚙️ Checking / Matching All Files In Working Directory Of Master Branch
As we have been moved to the Master branch. So, now to confirm that the Parent Branch won’t inherit Files & Commits of the Child Branch, we’ll Check / Match all files in the Working Directory of the Master Branch.
To list all the files in the Working Directory of the Master Branch we’ll use the command ls
It’ll list all the files present in the Master Branch i.e. files “a.txt”, “b.txt” & “c.txt”. But not any of the files that we had created in the Child branch “Child1” i.e. files “x.txt”, “y.txt” & “z.txt”.

⚙️ Checking / Matching Tracked Files On Master Branch
As we have been moved to the Master branch. So, now in order to confirm that the Parent Branch won’t inherit Files & Commits of the Child Branch, we’ll be checking / Matching all the tracked files in the Working Directory of the Master Branch.
To list all the tracked files in the Working Directory of the Master Branch we’ll use the command git ls-files
It’ll list all the tracked files present in the Master Branch i.e. files “a.txt”, “b.txt” & “c.txt”. But not the tracked files that we had created in the Child branch “Child1” i.e. files “x.txt”, “y.txt” & “z.txt”.

⚙️ Checking / Matching Logs In Master Branch
As we have been moved to the Master branch. So, now to confirm that the Parent Branch won’t inherit Files & Commits of the Child Branch, we’ll be checking / Matching the Logs in the Master Branch.
To list the logs in the Master Branch we’ll use the commandgit log --oneline
It’ll list all the previous logs & commit IDs that were present in the Master Branch after committing the files “a.txt”, “b.txt” & “c.txt” one by one.
But it’ll not show any of the commits that we did in the Child Branch “Child1”.

⚙️ Checking The Position Of Head In Logs In Master Branch
As we have been moved to the Master branch. So, now to confirm that the Parent Branch won’t inherit Files & Commits of the Child Branch, we’ll be checking the position of the Head in logs in the Master Branch.
To list the logs in the Master Branch we’ll use the commandgit log --oneline
We’ll see that the HEAD has been pointing to the “Master” Branch.

Note: While switching to the branch, Git only does one operation, and that is Reassigning HEAD to the current Active Branch.
🏷️ Multiple Use Cases Of Branching
There are multiple use cases where branching is required.
Without affecting the main flow of the development, we can hot-fix the error using the concept of Branching.
Example:
If we have multiple commits on the Master Branch.

Now, if we move the commit “C3’s” code-base to the production.
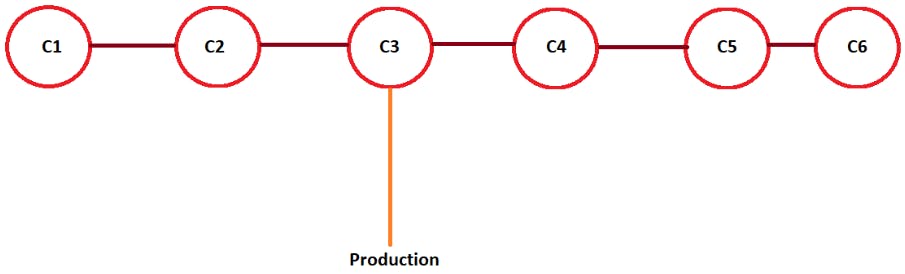
But still, the developers are working on the next release from the commit of the code-base “C4”, “C5” & “C6”.
Now, if some bugs are being identified in the production’s code-base. And we have to fix it immediately (Hot-fix).
Note: Hot-fix means fixing the bug Immediately. And fixing that error is known as Patch.
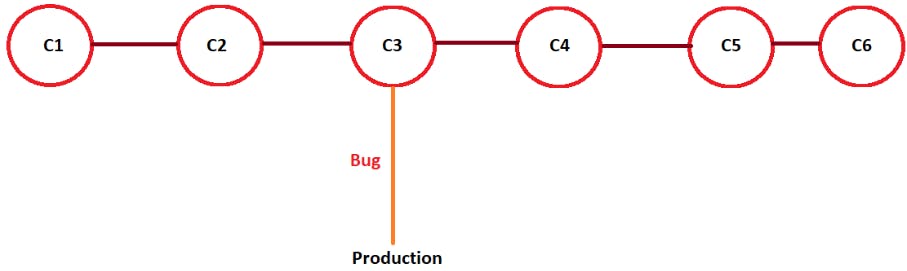
So, without affecting the main-flow i.e next release from the commit of the code-base “C4”, “C5” & “C6” we can fix the bug using the concept of Branching by creating a branch at the code-base of the commit “C3”. And then fixing the bug, and after that pushing it to production again.
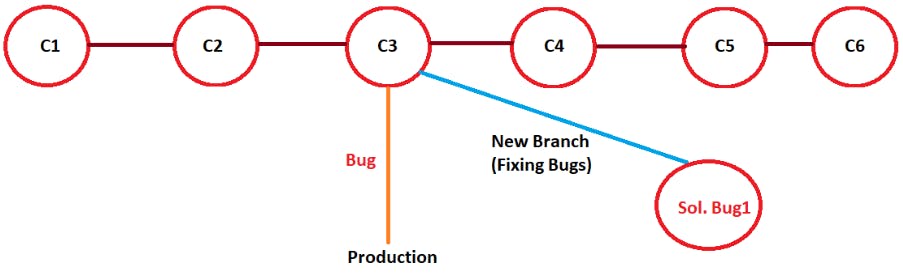
Note: For every project, there is a separate branch for the production code to fix the error.
If a team wants to work on new features after finishing, they will merge them into the master branch. It's just a good choice to keep the production branch separate so that there will be no confusion. (for example if someone merges anything by mistake it will be merged to the master branch, but if the master branch is itself a production branch it will create issues for the users of the software product)
To support multiple versions of the same code base we’ll require branching.
Ex: An old version of the software is having some bugs, but we don’t want to affect the other new versions after that version.
So, we’ll create a branch at that version by cloning the source code of that version, then fixing the Bugs and after that pushing it to production.
Here are few more real-life use cases where branching is commonly used:
Feature Development: When working on a new feature, developers can create a separate branch to work on that specific feature without affecting the main codebase. They can experiment, make changes, and collaborate with other team members on the feature branch, keeping the main branch stable and unaffected until the feature is ready to be merged.
Bug Fixes: When a bug is discovered in the main codebase, developers can create a branch to fix the bug. This allows them to isolate the bug fix from ongoing development, test the fix thoroughly, and then merge it back into the main branch once it's verified.
Experimentation: Developers often create branches to try out new ideas, experimental features, or alternative implementations. They can iterate and modify code without affecting the stability of the main branch. If the experiment is successful, they can merge the changes back into the main branch; otherwise, they can discard the branch.
Release Management: Branching plays a crucial role in managing software releases. A stable branch, often called a release branch, is created to prepare the software for deployment. This branch receives only critical bug fixes and necessary updates to maintain stability. Meanwhile, development continues on separate branches, allowing the team to work on new features and bug fixes for future releases.
Collaboration and Code Reviews: Branches facilitate collaboration among team members. Each developer can create a branch to work on a specific task or feature. They can then share their branch with other team members for code review, feedback, and collaboration. Once the code review process is complete, the branch can be merged into the main branch.
Hotfixes: In the event of a critical bug or security vulnerability in the production code, a hotfix branch can be created from the stable release branch. Developers can quickly address the issue in the hotfix branch, test it thoroughly, and deploy it to production. This allows for immediate fixes without disrupting ongoing development on other branches.
🤝 Next Topic Git Merge on Tuesday !!!!!!!!!!!
👋👋👋👋