


🔊 Introduction
A "merge conflict" occurs when there are conflicting changes to the same file or files that Git cannot automatically resolve during a merge operation. A merge conflict typically happens when two or more branches have made conflicting modifications to the same lines of code or when one branch has deleted a file that another branch has modified.
When Git encounters a merge conflict, it marks the conflicting sections in the affected files and presents you with a "merge conflict" status. It indicates that you need to manually resolve the conflicts before completing the merge.
GIT will markup the content of both the branches (Parent & Child), to resolve the conflict very easily.
If we have multiple files & large codes, then solving the conflicts manually will take more time.
But to resolve this issue we have Merge tools.
Ex: p4Merge
Merge conflicts can arise in various scenarios, such as:
Modifying the same file in different branches: If multiple branches have made changes to the same part of a file, Git may not know which changes to keep and presents a conflict.
Deleting or renaming files: If one branch has deleted or renamed a file that another branch has modified, a conflict can occur.
Diverging commit history: When attempting to merge branches with diverging commit histories, conflicts can arise if changes made in one branch affect the changes made in another branch.
🔊 Practical
Create a new directory named “conflict” using mkdir. And move inside into that directory using the command cd

Now, initialize that directory using the command git init

Create a file “a.txt” and write “Added first line” in that file using the command echo. Therefore, the command will beecho <“Content” > <filename>
In our case, it’ll be echo "Added first line" > a.txt

Add that file “a.txt” to the Staging Area and then Commit that file to the Local Repository.
We’ll use the command git add a.txt; git commit -m "Master Commit 1"

Now, again add some content by writing “Added second line” in that file using the command echo. Therefore, the command will beecho “Content” >> <filename>
In our case, it’ll be echo “Added second line” >> a.txt

Add that file “a.txt” to the Staging Area and then Commit that file to the Local Repository.
We’ll use the command git add a.txt; git commit -m "Master Commit 2"

Now, check the content of the file “a.txt” using the command cat . There will be 2 lines.

Now, there are two commits available at the Master Branch. To confirm that we’ll check the log using the command git log --oneline

Now, we have to work on a feature, so we’ll create a child branch named “feature”.
So, we’ll create a child branch and switch to that branch using the command git checkout -b <branch name>
In our case, it’ll be git checkout -b feature

We’ll now confirm the total no. of branches and whether we switched to the new Child Branch “feature” or not. To confirm both, we’ll use the command git branch

We’ll see there are total of two branches:
master
feature <Child Branch>
And we’ll also see the position of the star “*” on the “feature” i.e. Child Branch; This indicates that we have been switched to the Child Branch.
Now, from the feature branch again add some content by writing "Added first line in the feature branch" in the file “a.txt” using the command echo. Therefore, the command will beecho “Content” >> <filename>
In our case, it’ll be echo “Added first line in the feature branch” >> a.txt

Add that file “a.txt” to the Staging Area and then Commit that file to the Local Repository.
We’ll use the command git add a.txt; git commit -m "Child Commit 1"

Now, there will be three commits available at the Child Branch. To confirm that we’ll check the log using the command git log --oneline

Now, HEAD will be pointing to the last commit of the Child Branch.
Now, we’ll switch back to the Master Branch, as we have to perform the demo of the Three-way Merge. And we are on the Child Branch “feature”. So, to switch the branch, we’ll use the commandgit checkout <Branch Name>
In our case, it’ll be git checkout master

Now, we switched back to the Master Branch.
Here, we’ll confirm the total no. of lines/content that we had added & commit in the file “a.txt” on the Master Branch using the command cat
There will be a total of 2 lines that we had added & commit in the file “a.txt” on the Master Branch as we didn’t perform the Merge operation till now.

Now, we’ll again add some content by writing “Added third line” in the file “a.txt” using the command echo. Therefore, the command will beecho “Content” >> <filename>
In our case, it’ll be echo "Added third line" >> a.txt

Add that file “a.txt” to the Staging Area and then Commit that file to the Local Repository.
We’ll use the command git add a.txt; git commit -m "Master Commit 3"

Now here we added and committed some content in the Master Branch as well.
Now we’ll merge the feature Branch to the Master Branch. We’ll merge the Child branch to the Master Branch by staying/switching to the Master Branch.
As we have made the changes in the same file “a.txt” by adding some data in both branches. So, if we’ll merge the Child Branch with the Parent Branch, then GIT will not be able to decide which changes are to be considered as the final change in the file “a.txt” on both branches.
This will result in Conflict. To merge the Child Branch with the Master Branch we’ll use the command git merge <Branch Name>
In our case, it’ll be git merge feature

It will be displaying that the automatic merge has failed; We have to fix the conflicts and commit the result manually.
This shows internally GIT will compare the content of the files.
Now, we’ll check the status of GIT using the command git status
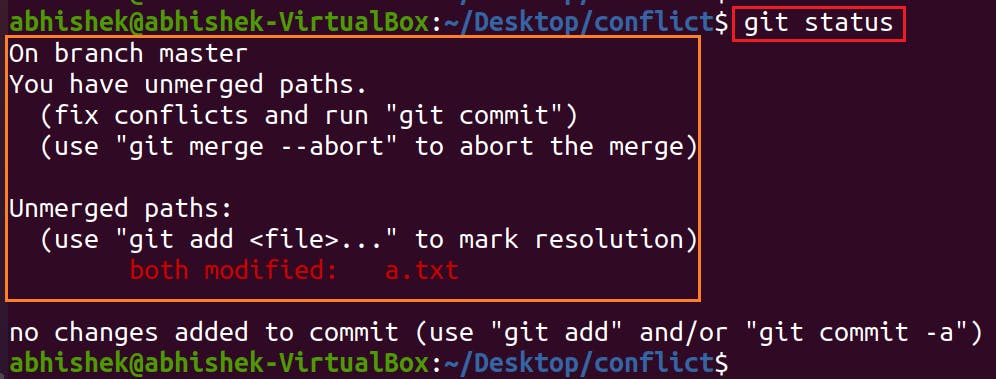
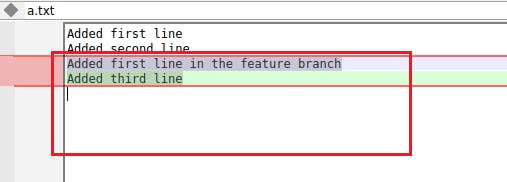
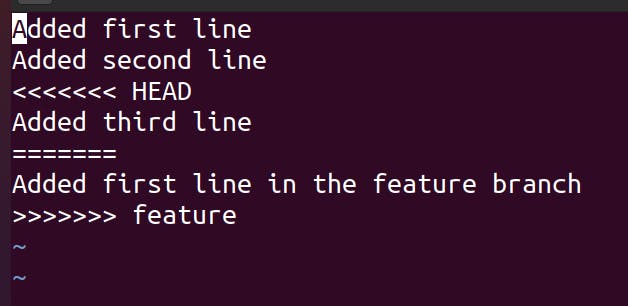
Now, as we know that in the case of conflict, GIT will markup (mention) the content of both the branches (Parent & Child), to resolve the conflict very easily. Therefore, we’ll check the content of the file “a.txt” using the command cat
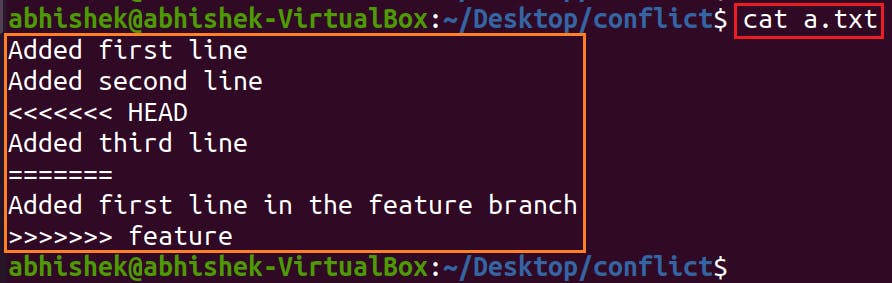
The first & Second lines had been added before creating the Child Branch (feature).
The third & fourth line is telling that the data mentioned in the fourth line has been added to the Master Branch.
The sixth & seventh line is telling that the data mentioned in the Seventh line has been added to the feature branch.
So, now it depends on us to decide which content we want to be there in the file “a.txt”.
If we want any of the content, then the other content should be deleted.
If we want to keep both the content, then we have to keep the file as it is.
🔊 Resolving Conflicts
We can resolve the conflict in two ways:
Using Mergetool (ex: p4merge)
Manually
🏷️ Using Mergetool
We can resolve the conflict using the merge tool. Example: p4merge.
⚙️ Setting Up P4merge
We’ll download the p4merge tool from its official website
https://www.perforce.com/products/helix-core-apps/merge-diff-tool-p4merge

Now, we’ll then choose the OS (family).
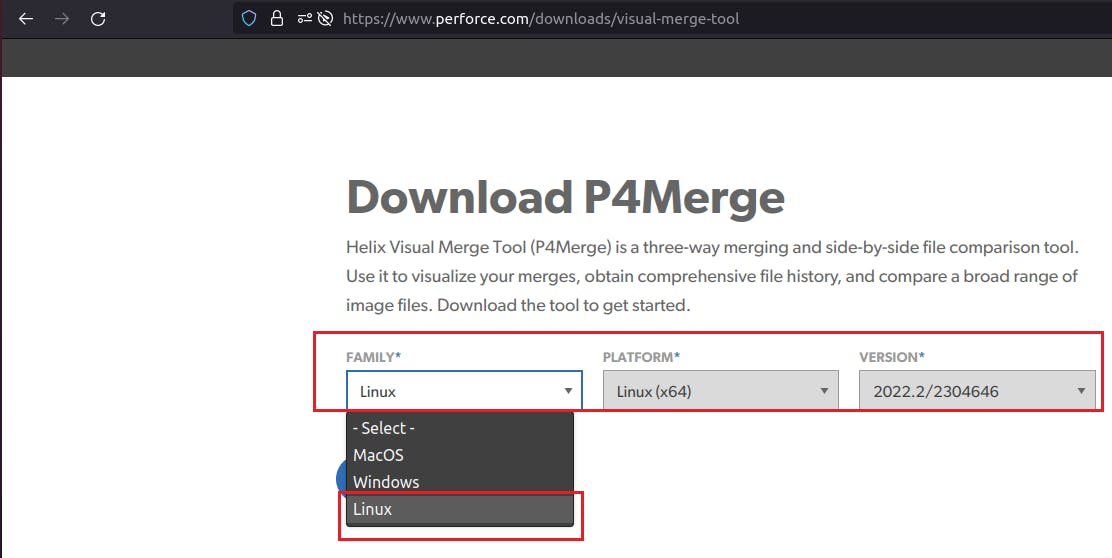
And then download the application.
Note: If we’ll download the p4merge tool in Linux then it’ll get downloaded as a .tgz file. So, we’ll convert it as a .tar file using the command gunzip<filename>

After that, we have to untar that file. Therefore we’ll use the command tar xvf <filename>
xvf :
x : Extraction
v: Verbose mode
f: file

Once downloaded extract it and copy the contents of the folder to a new folder /opt/p4merge

Move that extracted folder p4-2022.2.2304646 to the newly created folder in the p4merge in the opt directory under root (/opt/p4merge)
Therefore, we’ll use the commandsudo mv p4v-2022.2.2304646/* /opt/p4merge

To create a symlink for p4merge we’ll use the following command:
sudo ln -s /opt/p4merge/bin/p4merge /usr/local/bin/p4merge

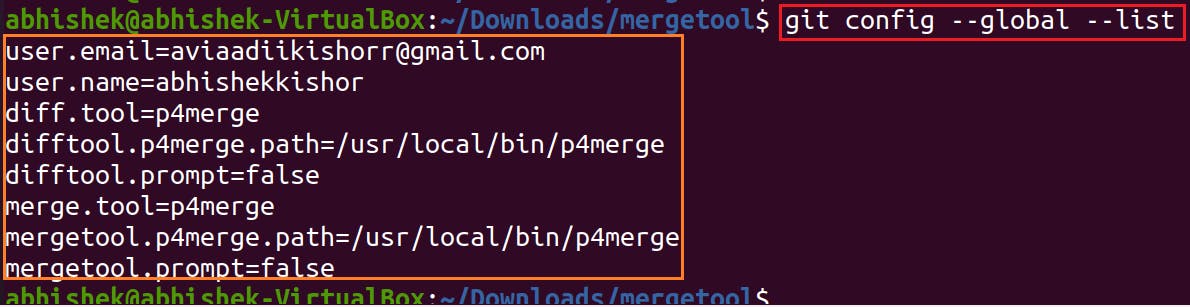
We need to configure it for all the projects and repositories (i.e. Globally) in GIT.
So, we’ll use the command: git config --global diff.tool p4merge

Now, once we configure the tool then we have to set the path for it.
So, we’ll use the command:git config --global difftool.p4merge.path <path of the p4merge>
For me, the path is /usr/local/bin/p4merge.
Therefore, the command in our case will be
git config --global difftool.p4merge.path /usr/local/bin/p4merge

After that we have to configure the prompt message (Do you want to open… type of message) on the screen. So, to remove that we have to configure it.
So, we’ll use the command: git config --global difftool.prompt false

So, we’ll not be prompted for confirmation each time. We need to configure the p4merge tool for all the projects and repositories (i.e Globally) in GIT.
So, we’ll use the command: git config --global merge.tool p4merge

Now, once we configure the tool then we have to set the path for it.
So, we’ll use the command:git config --global mergetool.p4merge.path <path of the p4merge>
For me, the path is /usr/local/bin/p4merge
Therefore, the command in our case will begit config --global mergetool.p4merge.path /usr/local/bin/p4merge

After that, we have to configure the prompt message (Do you want to open… type of message) on the screen. So, to remove that we have to configure it.
So, we’ll use the command: git config --global mergetool.prompt false

So, we’ll not be prompted for confirmation each time.
Now, if we want to check all the configurations that we have configured (globally) so far. So, for that, we’ll use the commandgit config --global --list
⚙️ Using GUI (Mergetool)
Now, to compare & merge the content of both branches, we’ll use the merge tool (GUI based).
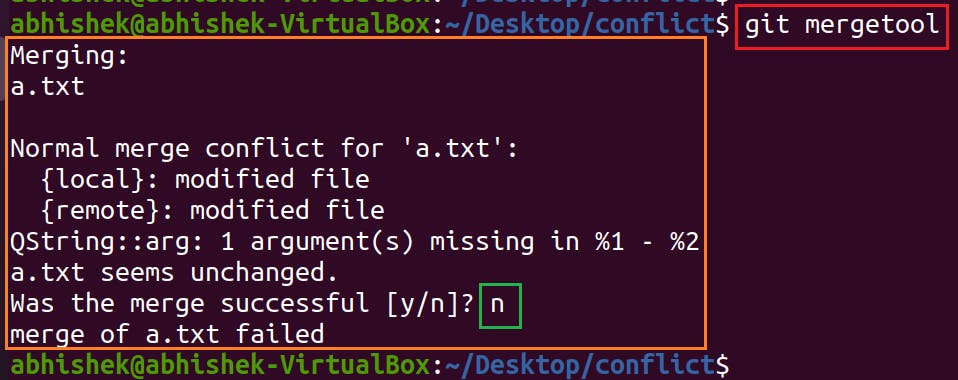
To open the merge tool, we’ll use the command git mergetool
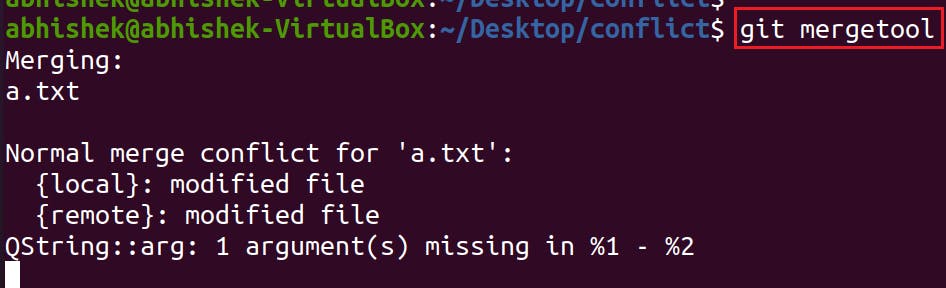
The GUI of Mergetool will get opened.
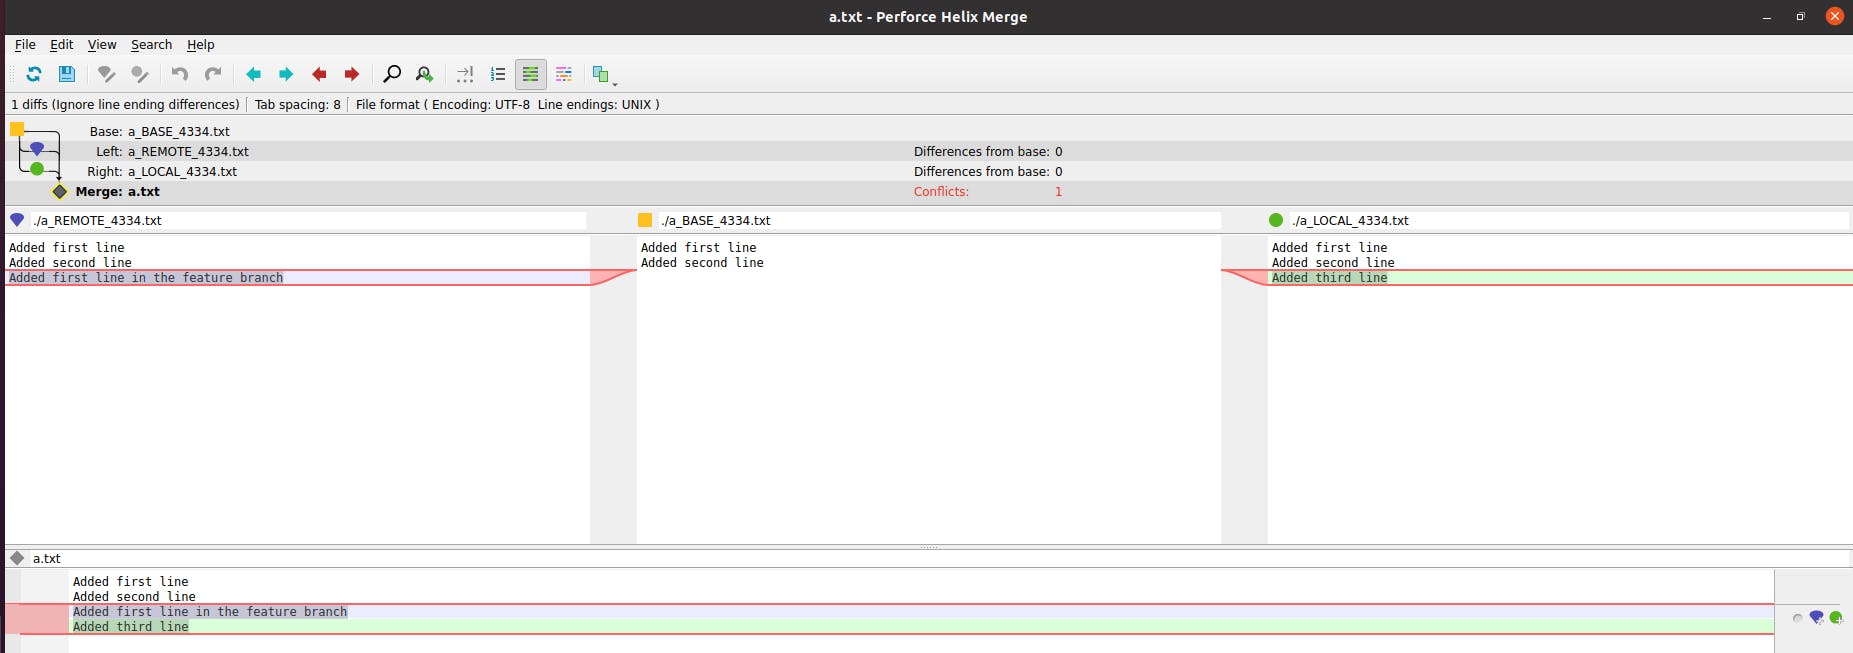
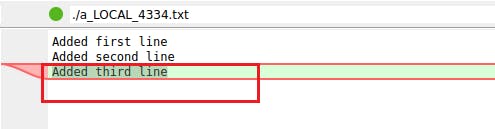
That tool will be having all the contents in each branch
Child Branch
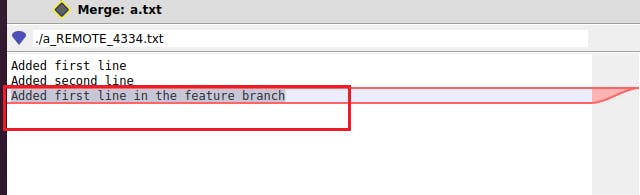
Base Content
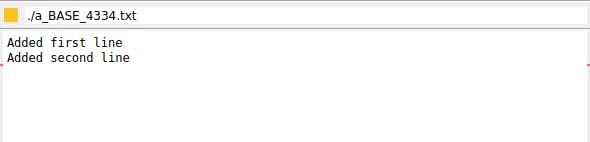
Master Branch
Which content we are required to keep? We can have both the contents or any of the two.
Total no. of conflicts

Switching between the conflicts.

There are background colours in both the branches
Blue
Green

So, now if we want to keep the content in Blue then we’ll click on the blue symbol on the right (down)

If we want to keep the content in Green then we’ll click on the green symbol on the right (down)

If we want to keep both the contents then we don’t have to do anything.
After changing things according to us we’ll click on the save button on the upper left side. Then the content by default will be saved.

Then close the merge tool.
While closing the merge tool it’ll ask if the merge was successful or not. So, we can type Y/N according to us.
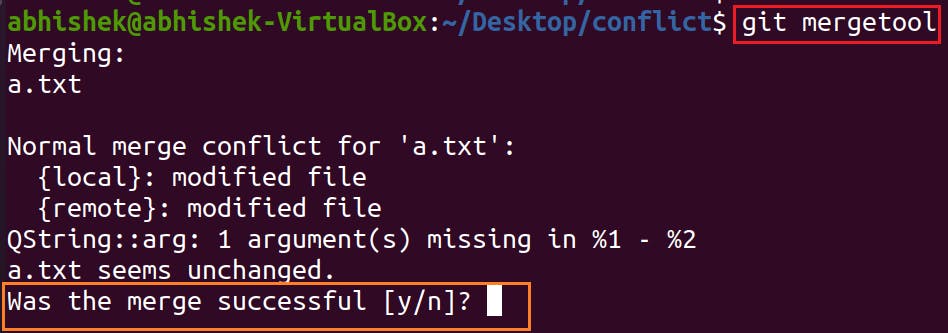
In our case, we’ll type “n” because we’ll have to resolve the conflict manually i.e. without using GUI/tool.
🏷️ Resolving Conflicts Manually
Open the file “a.txt” using any editor.
In our case, we’ll use vi editor. To open the file in the vi editor, we’ll use the command vi <filename>
In our case, it’ll be vi a.txt
So, we want to keep both the contents. To keep both the contents we’ll have to delete the following:
<<<<<<< HEAD
\=======
\>>>>>>> feature
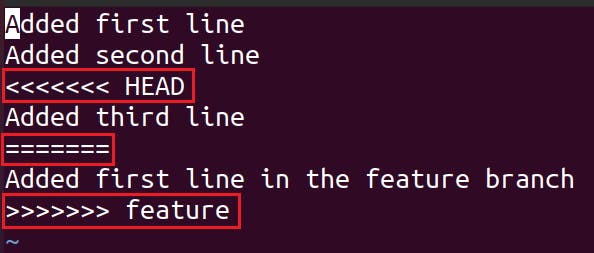
In order to delete we’ll go to that particular line and delete it.

Now press ESC and then type :wq to save the file.
Now, we’ll check the content of the file “a.txt” using the command cat

So, now the conflicts will be resolved. Now, we’ll merge the Child branch with the Parent Branch.
🔊 Merging Continues
So, now we have resolved the conflicts. Now we can merge the Child branch with the Parent Branch.
Before that, we’ll check the log on the Master Branch. There will be 3 commits on the Master Branch. To confirm that we’ll check the log using the command git log --oneline

Both the HEAD & master are pointing to the last commit on the Parent Branch i.e Commit 3
But before that, we’ll add the changes in the file to the Staging area.
So, check the status of git, using the command git status

Now, we’ll add the file a.txt using the command git add a.txt

The file will be added to the staging area. To confirm that, we’ll use the command git status
We’ll see if it’ll be telling changes to be committed.

Now, we’ll commit the file using the commandgit commit -m "Message"
In our case, it’ll be git commit -m "Resolved Merge Conflicts"
This is known as the Merge Commit. That is, a new commit we’ll be creating which is known as the Merge Commit.
So, after resolving the Merge Conflicts we created a new commit manually known as the Merge Commit.
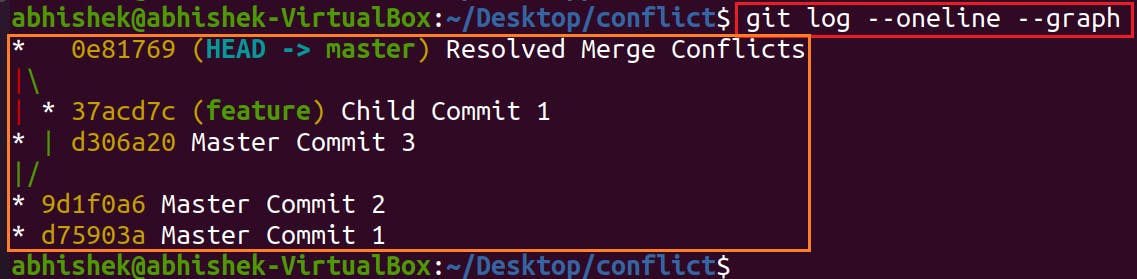
Now, we’ll check the log on the Master Branch. To check the log we’ll use the command git log --oneline Or git log --oneline --graph
git log --oneline
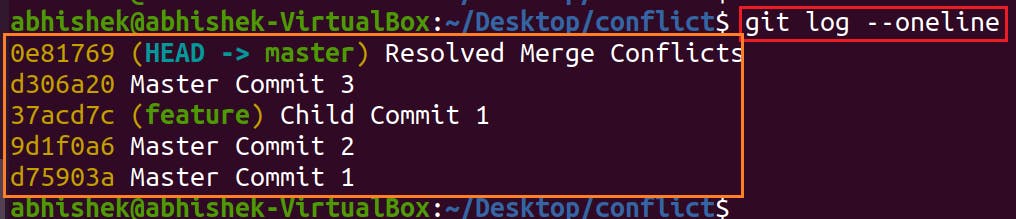
As the Child Branch (feature) has been merged with the Parent Branch, therefore the Commit of the feature branch is also present.
Now, Both the HEAD & master are pointing to the Merge Commit (Previously it was pointing to the last commit on the Master Branch i.e. Commit 3).
Merge Commit: If we’ll try to merge the Child Branch (feature) to the Master Branch, then a new commit will be created. That commit is considered as the merge Commit.
And, both the pointer i.e. HEAD & master will move to that new commit i.e. merge commit.
git log --oneline --graph